Appointments V4: Setup & Manage Book Groups in Dental4Web

ATTENTION: Appointment Book V4 is in PILOT MODE
- Available only to a selected few while we complete the pilot phase.
- General release is coming soon.
- During the Pilot phase, we are creating Knowledge Base articles and will continue to add and update them.

Organise Your Appointment Book with Groups
Appointment Book Groups let you bring selected books together into a single view, instead of showing every book at once.
There are three common scenarios for setting up groups:
- By Specialty: Practices with various specialties may find it simpler to group books in this way
- By Days of the week: On Monday, only books working on Monday will show
- By Order or Appointment Books: To change the order appointment books are shown onscreen
This article covers how to create a group, choose the days it shows, add and arrange books, and remove books or delete groups you no longer need.
Setup Appointment Books Groups
- Click the navigation menu > Appointments
- Click the hamburger menu > Show Group Settings
- What you see:
- Location: The location this group relates to (if applicable)
- + Create Group button: To create a new group
- List of existing Groups: The names of all the groups created
- Show in next days: The list of day(s) this Group will appear onscreen by default
- + Add Book button: To add a new book to selected group
- Share Book Group with all computers: The box is ticked if you wish to see the same groups on other computers
- Appointment Book names: The list of books in this group
- Select Location (if applicable) from the drop list
- Click + Create Group to add a new group
- On the New Group row, Click on Edit icon
- Enter the group name
- Click on the save icon (or Enter key works as well)
- Select the days of the week that this group will be shown
- Drop the list
- Tick box for the days where this group will be shown
- Next, Click + Add Book
- Tick Box to select the days to show
- Click Select
- Use the
to drag/sort the order of appointment books
- Click OK when setup is complete
Manage Appointment Book Groups
Remove book from to the selected group
- First, select the Group
- Next, select the book (The row is highlighted)
- Click delete icon
- Click OK
Delete a group
- Select the Group
- Click delete icon
 Read the message window before proceeding
- Click Delete or Cancel

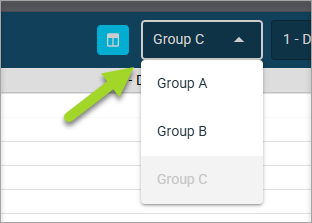
The Groups available to view can be selected from the toolbar when in Multiple book view