Setup & Manage Letter Category & Templates in Dental4Web

The Letters page is design to create and hold all Labels and Envelopes & letters written for the patient, from Case Presentations, Post Op instructions to Work Certificates.
To make the long list of options available the letters feature is broken into: Letter Category - Templates within - Patient letters
Where is the Letters page Found
Click the navigation menu > Patients > Letters page
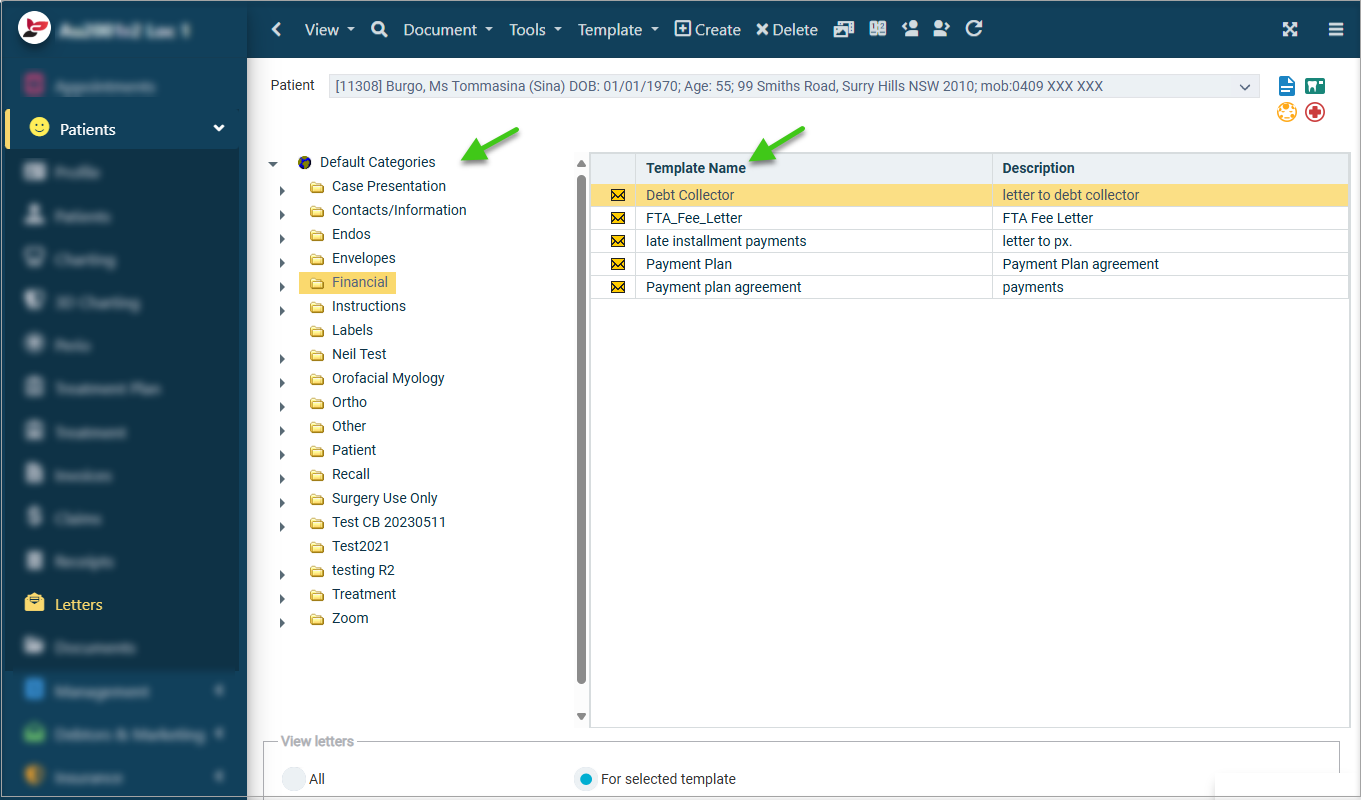
Letter Category
Create a New Letter Category
Letter categories allow the user to group templates & letters to make it simpler to find when required.
Default categories exist within D4Web, however the user can add more, suitable to their practice needs.
- Template Toolbar > Add New Category
- Specify Category Name: Enter the new category name
- Specify Category Description: Enter a description of the new category
- Select locations where this template will be available at (if applicable):
- Show at All Locations: Use to allow all locations access to this category
- Show at Selected Locations:
- Select in Not Available > click ADD SELECTED to Available
- Click OK
Rename a Letter Category / Change Category Location
Letter categories can be renamed and moved between locations.
- Highlight the category
- Template toolbar > Rename Category/Change Category Locations
- To Rename, the following sections can be edited:
- Specify Category Name
- Specify Category Description
- To change category locations, the following sections can be edited:
- Show at All Locations
- Show at Selected Locations
- Move from Available > Not Available and vice versa
- Click OK
Delete a Letter Category
A letter category can only be deleted if no templates are linked to it
- Highlight the category
- Template toolbar > Delete Selected Category
- Select Yes to proceed with the deletion
Letter Templates
Create a New Letter Template
Letter templates can be created under ANY patient file and be available for all patients.
- Highlight the Category to add the template to e.g. Instructions, Case Presentation
- Template toolbar > Create Template
- Specify template name: Type template name e.g. How to Brush
- Specify template description: Type the template description e.g. Brushing Instructions
- Select locations where this template will be available at (if applicable):
- Show at All Locations: Use to allow all locations access to this category
- Show at Selected Locations: Select in Not Available > Add Selected to Available
- Click OK
- A blank template will show onscreen ready to design using freehand text, importing images and placing input fields in relevant places
- Mail Merge tab > Add Field
- Select the Fields available in the list to the Template
- Click OK
Rename a Letter Template / Change Template Location
- Select the Category (left of screen) the template is saved within
- Select the template (Listed under category)
- Template Toolbar > Rename a template/Change Template Locations
- The following sections can be edited
- Specify template name
- Specify template description
- Show at All Locations
- Show at Selected Locations
- Move from Available > Not Available and vice versa
- Click OK
Delete a Letter Template
A letter template can only be deleted if the letter has not been produced for a patient. Alternatively, make the template inactive so it is no longer used.
- Select the Category (left of screen) where the template is saved in
- Select the template (listed under the category)
- If the template never been used, you are able to delete it:
- Template Toolbar > Delete Template
- Click YES
- If the template has been used, you are not able to delete it, but can mark it as inactive
Make a Letter Template Inactive / Active (reactivate)
Mark as Inactive
- Select the Category (left of screen) the template is saved within
- Select the template (listed under category)
- Go to Template toolbar > Mark Template as Inactive/Active
Reactivate Inactive
- Select the inactive template (listed under the category)
- Go to Template toolbar > Mark Template as Inactive/Active
Envelope Templates
This feature allows the set up of envelope templates in D4Web.
Ensure the printer being used is configured for printing envelopes.
- Highlight Envelopes category
- Template toolbar > Create Template
- Specify the Template Name and Description
- Click OK
- When the letter template opens, delete the default information before you insert the new input fields
- Ensure the margins are set to fit an envelope
- Next, Click Add Field
- Select required fields from the list (hold Ctrl key to select more than 1)
- Click OK
- Input fields are automatically inserted in a row, position the input fields on the envelope correctly
- Once you have inserted all the fields correctly in their positions, Select File > Save
- You can view the envelope template by selecting File > Print and adjust the position of the fields if desired
- Save the template before exiting if you have made adjustments
Create Letter for Patient
