Managing eAppointments

Easy Booking Mode and Stop a patient booking an online appointment.
Make eAppointment Reasons Mandatory. Set, Assign & customise the default eAppointment Appointment Reason, Customise the order of the Provider and Reason
Create Promotions within the eService Portal: Allocate, Delete/Suspend, Modify a Promotion to a Provider. Promotion History, book an appointment for a Promotion.
Managing eAppointments in the eServices Portal
Add Header to eAppointments Page
A Header can be customised on the eAppointments page within the eServices portal
- Go to
Menu > Practice Management
- eAppointments Management
- Display Options
- Your Welcome Text: Enter text for the patients to see when scheduling an eAppointment
- Click Save
Easy Booking Mode
This feature allows a patient to book an appointment online without having to create an account.
- Within the eServices portal
- Go to Menu > Practice Management
- Select eAppointments Management
- Select Display Options
- Tick Use easy booking mode
- Tick Email is mandatory for easy booking. Tick if you require the patient's email address
Stop a Patient Booking an Online Appointment
This feature allows practices to stop certain mobile numbers from making an online booking.
Staff with the role of Practice Administrator and higher will be able to block mobile numbers.
- Within the eServices portal
- Go to Menu > Practice Management
- Select Locations Management
- Select Blocklist
- Select the Organisation Name
- Select the Surgery Name
- At search you can enter the mobile number to check that it has not already been blocked
- Click Block new number
- In Phone number enter the mobile number
- Enter notes e.g. the reason the number is being blocked
- Multi-locations you can select which practices the mobile number will be blocked
- Select Block

Note: A patient on an "eAppointment block list" will not be prevented from booking though other means, such as:
Patient Discovery, Health Engine, HotDoc, etc.
eServices/eAppointments has no knowledge or visibility of these other block lists, therefore user is required to block patient directly via the platform where the booking is made.
Unblock a Mobile Number
- Within the eServices portal
- Go to Menu > Practice Management
- Select Locations Management
- Select Blocklist
- Select the Organisation Name
- Select the Surgery Name
- At search enter the mobile number
- Click on the mobile number
- Select Unblock
- Multi-locations you can select to unblock for all locations or only certain locations
eAppointment Reasons
Setup Appointment Reason
Setup the Appointment Reasons for patients to select when scheduling their eAppointments.
This helps filter the list of available appointments and notify the practice of the main reason for the booking.
Within the eServices portal
- Go to
Menu > Practice Management
- Select eAppointments Management
- Press Appointment Reasons List
- Before adding a reason check that the reason is not available.
- Enter the reason in the Search bar
- A list of reasons that match the search reason will be displayed
- Click Add
- Enter the Reason
- Click Add
- A prompt will appear confirming the new reason has been added successfully
Set Duration of Appointment Reason for each Provider
- Select the provider from the Practitioner Name list
- Select an Appointment Reason from Add reason from list
- Click the Plus icon
- In the 'Set duration of reason' window:
- Click - to reduce appointment preset slot default duration
- Click + to increase appointment preset slot default duration
- Click Save
Remove/Deactivate/Edit a Reason
The reason can only be removed (deleted) if it has not been used.
Select Edit to make changes
- Select the reason
- Click delete
- A prompt will appear to ensure if you want to proceed with the deletion
- Select Yes or No
- A prompt will appear confirming the reason has been deleted successfully
- If the reason cannot be deleted a window will appear stating the reason
Edit a Reason
- A reason can only be edited if it is not associated with a Provider book
- Select the reason
- Select Edit
- Make changes to the reason
- Select OK
Set the default eAppointment Appointment Reason
When an appointment is scheduling via eAppointments, a default Appointment Reason can be selected, or set to No default reason.

- Within the eServices portal
- Go to Menu
> Practice Management
- Select eAppointments
- Press Display options
- Select a reason, if nothing is selected, then No Default Reason will be the default
Make eAppointment Reason Mandatory
When a patient is scheduling via eAppointments, there is the option to make the selection of the Appointment Reason mandatory.
This allows filtering of vacant appointments based on which Providers offer the service, and how long the appointment should take.
- Within the eServices portal
- Go to Menu
> Practice Management
- eAppointments Management
- Display Options
- Selection of Reason is Mandatory: Tick to ensure patients select a reason each time they schedule via eAppointments
Assign eAppointment Reasons to Providers
The eAppointment Appointment reasons can be linked to Providers so only those who offer such services show vacant appointment slots when a patient selects it. Additionally, each Provider can specify the length of the appointment duration for each reason.
For example, Dr John Smith will accept Consultation appointments and prefers 30mins. However, Dr Sally Jones only wants 15mins for the same type of appointment.
- Within the eServices portal
- Go to Menu
> Practice Management
- eAppointments Management
- Providers Reason List
- Surgery Name: Select the practice from the list
- Practitioner Name: Select the Provider from the list
- Select an Appointment Reason from Add reason from list and click the Plus Icon
(a maximum of 20 reasons for each provider)
- Change the duration of the appointment by using the -/+
- Click Save
- Reasons can be deleted or modified within Active Reasons
- Repeat until all Providers and Reasons are setups as offered at the Practice
Customise the order of the Provider & Reason on the Search Page
The order the Providers and Reasons are displayed on the Search page can be customised.
It can be displayed in alphabetical order, or an order adapted by the practice.
- Within the eServices portal
- Go to Menu
> Practice Management
- Select eAppointments Management
- Select Display Options
- Select Practice
Provider display order
- Default (alphabetical) will put the provider in an alphabetical order
- Click Customized to customise the provider order
- Select Customised
- Use the drag and drop feature to move the providers to the preferred order
- Click Save
Reason display order
- Default (alphabetical) will put the provider in an alphabetical order
- Click Customised to customise the reasons
- Select Customised
- Use the drag and drop feature to move the providers to the preferred order
- Click Save
Add a Fee to an Appointment Reason
A fee can be displayed for appointment reasons, so the patient knows the cost of the appointment.
- Within the eServices portal:
- Go to Menu
> Practice Management
- Select eAppointments Management
- Select Providers Reason List
- Select a provider from the Practitioner Name
- Select the Reason
- Click the edit icon
- Enter the fee
- Click Save
Deleting Appointment Reasons for Providers
An appointment reason can be deleted. If the reason is associated with a preset slot, you will be alerted to remove the reason in Dental4Windows before the reason can be deleted.
- Within the eServices portal
- Go to Menu
> Practice Management
- eAppointments Management
- Providers Reason List
- Surgery Name: Select the practice from the list
- Practitioner Name: Select the Provider from the list
- Select the delete icon
next to the reason to be deleted
- If the deleted reason is associated with a Preset slot, a message will appear
Promotions for eAppointments
Create Promotions
If the practice is running a promotion, this can be made available as an appointment selection online.
Several promotions can be available at once or one at a time
- Within eServices, select
- Select Practice Management
- Select eAppointments Management
- Select Promotions Management
- Select +Create New
- Fill in the fields
- Name (visible for patients) - Name of the promotion e.g., Mouthguard Promotion
- Connected Reason - link the promotion to a reason that has been linked to a provider e.g. Consultation
- Description (option, not for patients) - explanation about the promotion. The patient will not see this
- Period - Enter a date range. If the promotion is to be permanent, then leave the date range empty. You will be able to suspend/resume it in the Promotions Management window
- Pricing - a fixed fee can be selected. This will apply to all providers taking part in the promotion. Or a percentage can be entered, and this percentage will apply to the fee for each provider
- Select Save
- If the practice is running more than one promotion at a time, then follow the steps above again for additional promotions
Allocate a Promotion to a Provider
Promotions can be allocated to individual providers who are offering the treatment.
The promotion must be created before allocating to a Provider. See Create Promotions above for instruction.- Within eServices
- Select
- Select Practice Management
- Select eAppointments Management
- Select Providers Reason List
- Select the provider
- Select the reason linked to the promotion
- Select the edit icon
- Set the duration of the appointment
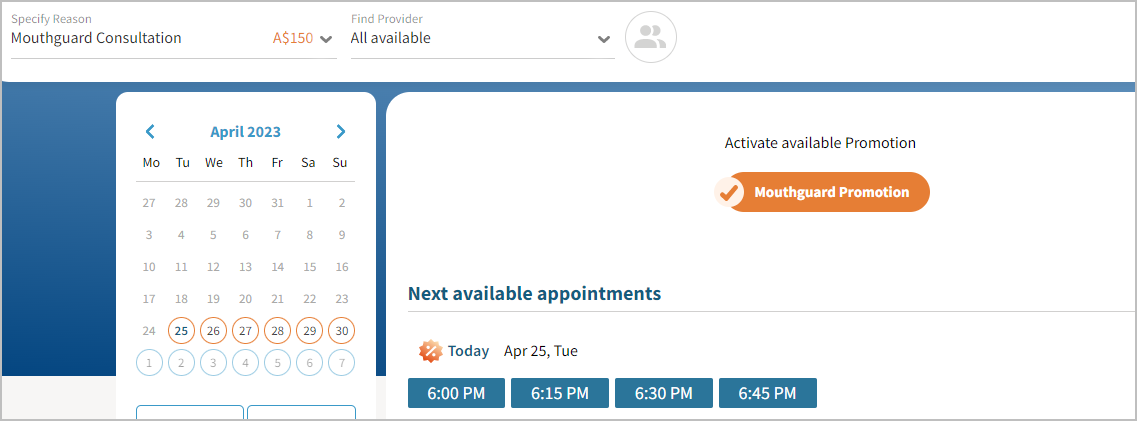
- Click Participate in Promotion<<Mouthguard Promotion>>
- Click Save
If several providers are offering the promotion, then repeat the above steps for each provider.
If the reason has not been selected for the provider
- At Add reason from list
- Search for the reason linked to the promotion
- Click
- Click Participate in Promotion<<Mouthguard Promotion>>
- Click Save
Delete/Suspend a Promotion
Once a promotion is created it can be deleted or suspended
Delete the Promotion
- Within eServices
- Select
- Select Practice Management
- Select eAppointments Management
- Select Promotions Management
- Click the promotion to be deleted
- Select Delete
- A prompt will appear to ensure the correct promotion is being deleted
- Select Yes or No
Suspend a Promotion
- Within eServices
- Select
- Select Practice Management
- Select eAppointments Management
- Select Promotions Management
- Select the promotion
- Select Edit
- Remove the end date
- Click Save
- Turn the toggle button off. Then at status Suspended should appear
Promotion History
Within Promotion management, the current and expired promotions can be viewed. With each promotion, there is a status to indicate how many online bookings have been made.
View Current Promotions
- Within eServices
- Select
- Select Practice Management
- Select eAppointments Management
- Select Promotions Management
- Select Actual this displays all the current promotions
- Name - the name of the promotion
- Reason - which reason is linked to the promotion
- Price - this will be the fixed price or the percentage
- Start - start date of the promotion
- End/Dur - end date of the promotion or indicates if it is a continuous promotion with no end date
- Status - this will indicate whether the promotion is active or suspended
- Bookings - how many bookings have been booked online for the promotion
- Description - explanation about the promotion
View Expired Promotions
- Within eServices
- Select
- Select Practice Management
- Select eAppointments Management
- Select Promotions Management
- Select Expired this displays all the current promotions
- Name - the name of the promotion
- Reason - which reason is linked to the promotion
- Price - this will be the fixed price or the percentage
- Start - start date of the promotion
- End/Dur - end date when the promotion expired
- Bookings - how many bookings have been booked online for the promotion
- Description - explanation about the promotion
Modify a Promotion
Once a promotion has been created modifications can be made for example extending the period that the promotion will run.
- Within eServices
- Select
- Select Practice Management
- Select eAppointments Management
- Select Promotions Management
- Click the promotion to be modified
- Select Edit
- Changes can be made within this window
- Click Save
Book an appointment for a Promotion
- Select the Promotion. This will display the dates and times that are available
- Select a Provider
- Select a date and time
- Confirm the appointment
At the Practice
The appointment will be processed via the normal process. The reason, promotion, and fee will appear within the notes of the appointment.
Redirect Patient After Appointment Booking
After a patient schedules an eAppointment, they can be automatically redirected to another URL. For example, to fill in an eForm or a landing page on the practice website with promotions.
Within the eServices portal
- Go to
Menu > Practice Management
- Select eAppointments Management
- Press Display Options
- Enter the name of the link in Redirection link name e.g. Practice Website Name
- Enter the URL of the link in After booking confirm redirect
The URL used here is for example purposes onlyIn Dental4Windows
eAppointments Report
eAppointments Report shows details of eAppointments booked in a selected period. Details of payments made via ePayments when booking an eAppointment can also be included.
Run the Report
- Go to Location Managment > Reports tab
- Open eAppointments Report
- Date: Select the period to base this report on
- Location: Select the location to base this report on if applicable
- Online Appointment Book: Select appointment book
- Include appointment source: Where the eAppointment came from
- Include appointment batch details: Include details of appointments if the appointment is in a batch
- Include ePayment details: Deposit details (ePayments) to be included
- Show cancelled bookings only: Shows only appointment that have been cancelled
- Click OK
Report Details
Location: Location of eAppointment
Book Name: Appointment book name
Appt. date/time: Date and time of appointment in Appointment Book
Patient Name: Name of patient
Patient Details: Contact details of patient
Created: Date and time appointment was created
Payment status: Last status of payment e.g. refunded for deposits that have been refunded back to the patient
Amount: Amount of the deposit paid for that appointment
Receipt: Receipt number in Dental4Windows of deposit created
Source type: Where the appointment source was
Source name: Source name of the appointment
Status: Appointment status
Batch info: if the appointment is part of a batch it, contains the Batch ID and count of appointments in the batch
Last changed: Date/time of last changes of the appointment
Changed by: Username who made the changes
PC name: Name of computer where changes occurred
In Dental4Web (coming soon)
Related Articles
View & Manage eServices Management Console Dental4Web
eServices Management Console Found in the Appointment Book Toolbar: Click eAppointments or Click the hamburger menu > View eAppointments Scheduled eAppointments When an eAppointment is successfully scheduled, it will automatically appear in the D4Web ...Managing eKiosk
Below is how to link eForms to eKiosk for Dental4Window or Dental4Web. Managing eKiosk in the eServices Portal (we are prepping, coming soon) Managing eKiosk in Dental4Windows Link eForms to eKiosk When a patient checks themself in with eKiosk they ...Managing eForms
Listed below is how to create a new eForm, edit, delete and deactivate an eForm, add a hyperlink to a form and how to deactivate a form. Managing eForms eServices Portal Create a New eForm The below instructions cover each of the options available ...SMS Manager: Managing SMS Replies in Dental4Windows
Listed below are instruction on Managing replies from appointment reminders, and SMS's sent from Queries, Recalls and Patient details. Managing Replies from Appt Reminders When an SMS is sent from the Appointments and the Patient replies, the replies ...SMS Manager: Managing SMS Replies in Dental4Web
The SMS Manager page holds all SMS replies from Appt reminders, Appt notifications, Patient records, Recalls & Queries. Where to find SMS Manager page Click the navigation menu > Management > SMS Manager page Managing SMS Replies... Sent from Appt ...