Setup & Manage Fees in Dental4Web

Fees Levels are created, then can be edited, updated, for each locations (if using multi location).
Multiple fee levels can be created for practices charging different amounts depending on patients connection to Schemes, Insurances, Concessions etc.
Providers are also able to have individual fee levels to suit their unique charging requirements.
Each Item can also have a GST component, a variable or locked mode, surcharges can be added for weekend and/ or public holiday work
Where to find the Fees page
Click the navigation menu > Management > Fees page
Setup Fee Levels
Create a New Fee Level
- Click NEW LEVEL
- from: Optional - select an existing Fee Level Name to copy fees from
- To new: Enter the name of the new fee level
- Since: Enter the start date of this new fee level
- Click OK
Add Fees to the New Level
- Highlight the fee level
- Fee($): Enter the dollar amount, including GST
- Mode: Select if this items fee is
- Variable: Can be altered in Treatment Plan, Treatment and by Discounts
- Fixed: Cannot be altered in Treatment Plan or Treatment. Special permission required for Discounts.
- Increase: Can only be increased in Treatment Plan and Treatment. Special permission required for Discounts.
- Decease: Can only be reduced in Treatment Plan and Treatment.

NOTE: GST is set within items.
Setup Location Based Fees
Follow these instructions when working in a multi-location environment where fees are set per location, rather than share between all locations.
Considerations
- All locations will contain the same fee level names
- Fee Level period dates will be the same for all locations
- A user is able to set the default fee level on a per location basis i.e. each location can have a different default fee level
- When a user activates Use Location Based Fees, the existing default fee levels for existing locations is kept
- When a user activates Use Location Based Fees, Provider based fees is not possible
- When a user selects Set as default level, the selected fee level will be made default for the location the user is viewing
- Where a user adds a new fee level it will be made available to all locations
- Where a user chooses to copy Fees when creating a new fee level all locations will be given the same Location Fees
Select Location
Once the Location Based Fees feature is activated, location-related options will be available within the Fees page to allow users to set a fee for an item based on the location at which the treatment was performed (Location fee).
To view/add/edit fees, select the appropriate Location first
Then select the Fee level name
Select How a Patient is Assigned a Location Fee Level
As patients move between locations, the system must know how to assign the fee level for the patient.
Make sure to Activate & Setup the Location based fees before proceeding.
- Operations toolbar > When setting Patient Fees...
- Use the location in patient details: The system will look for the patient’s location under Patient Records > Patient Details tab > Insurance /Various sub-tab
- Use the location of the patients main provider: The system will look for the location of the patient's main provider under Location Management > Providers tab and patient’s main provider under Patient Records > Patient Details tab
- Use the treating providers location: The system will look for the treatment provider’s location
- Operations Toolbar > When changing Treatment Provider...
- Prompt user to change or keep the item fee: Make selection in message popup
- Do not change the item fee: Nothing happens when changes are made
- Automatically change the item fee to Providers location: System searches for provider location information and settings and makes changes as needed.
Set Fee Levels per Provider (Provider Based Fees)
Provider Based Fees allows for Providers to have their own fee schedules for item numbers without having to change the fee level in the patients file.
The Provider selected when entering item numbers will determine the fee to charge.
Add Provider Fee Levels
- Click the navigation menu > Management > Fees page
- Create a new Fee level for each provider e.g. Dr Yates
- Enter the fees per Provider
- Highlight <Provider based> row
- Click SET AS DEFAULT LEVEL
Allocate Fee Level to Provider
- Click the navigation menu > Management > Providers page
- Select the Provider from the Provider drop list
- Select the Fee Level
Setup Patient File
All new patients will automatically be on the Provide Based fee level, however existing patients must be updated.
- Click the navigation menu > Patients > Insurance / Various tab
- Select the Fee Level as <Provider Based>
- This can also be completed when modifying an appointment and from the Treatment Plan or Treatment tabs.
Manage Fee Level features
Add New Fee Period
To ensure fees are never erased/typed over, Always create a new period start date before you edit/update your fees.
Treatment Plans and unaccounted treatment take information from the fees section, so it is best to keep a record of each fee charged per date range.
- Select the relevant fee level
- Click on the Add New Period icon
- Enter the new fee period start date
- Click OK
It is now possible to update fees (see next instruction), from the specified start date without affecting past fees
Drop list to view other fee periods
Update Fees
Once you have created a new period (see instructions above), add the new fees to the selected Fee level
There are two ways fees can be updated:
- Manual Update:
- Type over the existing fees in the new period
- Percentage Update:
- Click UPDATE THE FEES
- Select Increase fees or Decrease fees: Enter the % amount to increase or decrease by
- Fee range to update: Tick Update all fees or type in the From $ to $ fields.
- Round fees to the nearest: select to apply rounding
- Tick Inactive if this fee level is no longer in use
- Select which level to move any patients that are in this level
- Click OK
Modify a Fee Period
Modify the 'From' date to change the end of the previous period or modify the 'to' date to change the start date of the next fee period.
- Select the relevant fee level from the Period drop list
- Click Edit icon
- Enter the new date/s
- Click OK
Delete Fee Period
The Delete action will erase the selected period and the fees for that specific period.
The dates in the period before and after will automatically correct themselves so that they are successive again.
- Highlight the relevant fee level
- Use the Period drop list to find the period to delete (Note: You cannot delete the first period)
- Click Delete icon
- Click YES
Make Fee Level Inactive
When a Fee Level is no longer needed, make it inactive to ensure staff don't use it against patients.
- Highlight the Fee Level to make inactive
- Click UPDATE THE FEES
- Tick the Inactive box to make the level inactive
- Move Patient To: Select the active level to move all patients associated with the new inactive level to
- Click OK
Reactivate Fee Level
When a Fee Level has previously been marked as inactive, follow the same instructions as above to reactivate it (if needed).
- This time after clicking UPDATE THE FEES
- Remove the tick from the Inactive box
- Click OK
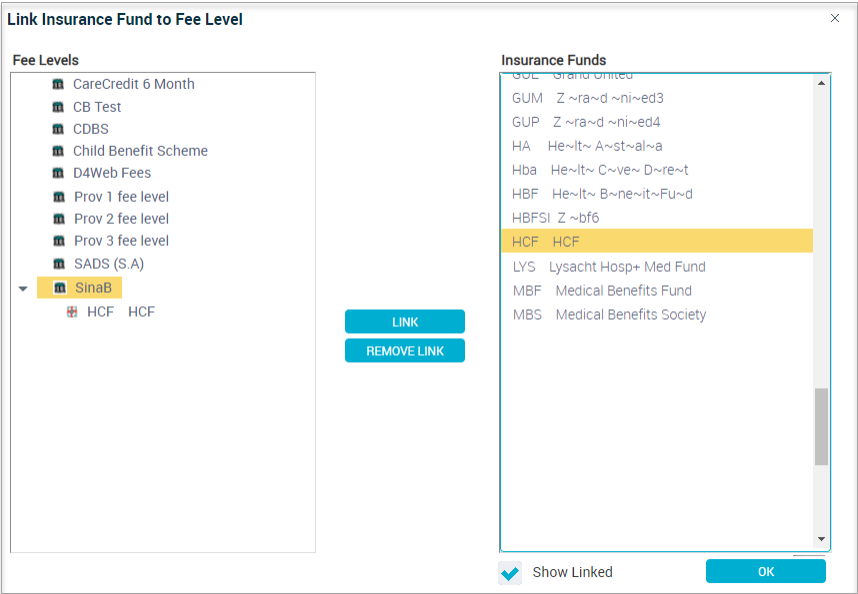
Link a Fee Level to an Insurance Fund
Link a Fee Level to an Insurance Funds for:
Provider fee level to Insurance fund. E.g. Provider fee level to Insurance Fund
or
or
Insurance that has their own Fee Schedule. E.g CDBS Fee level to CDBS Insurance Fund
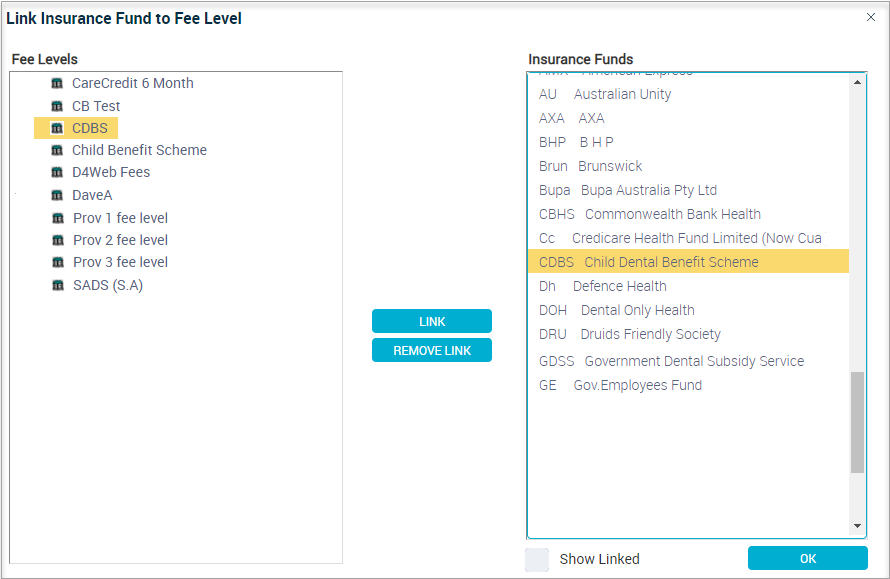
- Operations menu > Preferred Provider Scheme: Link Insurance Fund to Fee Level
- Fee Levels: Click on the Fee level
- Insurance Funds: Click on the Insurance Fund to be linked
- Click LINK
- Show Linked: Tick to show all linked Insurance Funds
- Click OK
Fee Modes
Each Item Number can have their fees set to one of the following modes:
Variable: Fee can be changed
Fixed: Fee cannot be changed
Increase: Fee can be increased
Decrease: Fee can be decreased
Fixed: Fee cannot be changed
Increase: Fee can be increased
Decrease: Fee can be decreased
By Default all items are set to Variable fee mode.
To change the mode,
- Select the Fee level
- Use the drop list in the Mode column and change
Set Public Holidays
The system knows when it is the Weekend, however as Public Holidays differ between States, Territories and Countries, it is up to the user to add relevant Public Holidays.
- Click SET PUBLIC HOLIDAYS
- Click ADD
- Holiday: Enter the holiday name or select an existing
- Date: Enter the date of the holiday
- States: Select the Location(s) this applies to, if applicable
- Click OK
 Public Holidays can be set via the System Tables page also.
 Add Fee Surcharges for Weekends and Public Holidays
It is possible to charge a Surcharge for work completed on Weekends and/or Public Holidays.
The Fee in Treatment or Treatment Plan will automatically update to include the Surcharge.
Once the feature is activated, and the Public Holidays are set (see above instructions), follow the below steps to set the Surcharge fees.![]()
- Select the relevant Fee Level
- Option A: Apply Surcharge Percentage to All Items
- Click on SAT / SUN or PHOL
- Enter the % amount
- Click OK
- Option B: Apply Surcharge to Select Items
- Within the relevant column: SAT / SUN or PHOL enter the percentage per item
Import Fees from External Source
Fees can be imported using a template found in D4Web
Once the fees have exported and entered into the template, they can be imported and shared between multiple practice locations.
Generate Fee Import Template
- Operations menu > Select Generate Fee Import Template
- Click the most relevant option:
- Export All Newest Fees
- Export Newest Non-Zero Fees only
- Generate Template with Zero Fees
- Tick box to select the Fee Level to Export
- Click EXPORT
- Select the downloaded file and choose a location for the file to be saved in
- Enter a File Name
- Save the file as CSV
- Click Save
- Next, open the file and add the fees against the relevant item
Import Fees
- Operations menu > Select Update Fees from File
- Fee Period Start Date: Enter the date the fees will become effective
- Click Select File for Import
- Find and select the file
- Click Open
- Select from:
- Add a new Period: A new period will be created with the new fee/s
- Update existing Period: The new fee will over right the existing fee/s
- Update existing or Add a new Period:
- Untick Period must be the Last
- Untick Adding / Updating Period only when Non-Zero Fees exist
- Click IMPORT FEES
- Press EXIT
Related Articles
Setup & Manage Fees in Dental4Windows
Listed below are instructions on how fees Levels are created, then can be edited, updated, for each location (if using multi location). Multiple fee levels can be created for practices charging different amounts depending on patients connection to ...Setup & Manage Laboratories in Dental4Windows
Listed below are instructions on how to add a new laboratory, add new lab staff, setup lab fees and add or remove lab stages. Feature Flash Video: Labs Module Setup Add a New Laboratory Category of Work Laboratory Categories of Work are the type of ...Dental4Windows Recommended Setup for New Customers
Below are instructions on Dental4Windows/Practice Studio Recommended Setup for New Customers. Dental4Windows/PracticeStudio Recommended Setup for New Customers Balance of Account If transferring from another system, enter the outstanding balances so ...New Zealand Dental Benefits Scheme in Dental4Web
The New Zealand Dental Benefits Scheme - Preset features, Adding & Editing, Generating Approvals & Claims Preset & Setup Features OHSA & SDSA Items OHSA & SDSA items are preset in D4Web Items page, there is nothing to do here. Click the navigation ...Setup & Manage SADS in Dental4Windows
SADS (EDS / GDS / PDS) insurance management. Dental4Windows and SADS (EDS / GDS / PDS) Insurance Management Prerequisites In order for the system to be able to operate as expected the following are needed: A copy of the current SADS schedule The ...