V4 Appointment Book Reports in Dental4Web

ATTENTION: Appointment Book V4 is in PILOT MODE
Available only to a selected few while we complete the pilot phase.
General release is coming soon.
During the Pilot phase, we are creating Knowledge Base articles and will continue to add and update them.

Get Insights from Your Appointment Book Reports
Dental4Web includes a range of appointment reports you can run straight from the Appointment Book, from printable daysheets to reports that show how your time, production and patient flow are tracking. Analyse work time and planned production, see who is arriving late or running overtime, report on appointment statuses and classes, and catch attended appointments with no treatment recorded.
This article covers where to find each report, what you need in place for it to work, and how to read the results.
Where to Find the Appointment Book Reports
Appointment Book Reports are found in the Appointment Book.
- Click the navigation menu > Appointments page
- Right click in any slot > Print > reports are listed here
 Note: Any patient specific option listed here are NOT considered general Appointment Reports (e.g. Appointment Card or Medical History Form), ensure the patient appointment is selected before right click for those options
General Appointment Book Reports
Print daysheet Standard
A printable daysheet for the selected date.
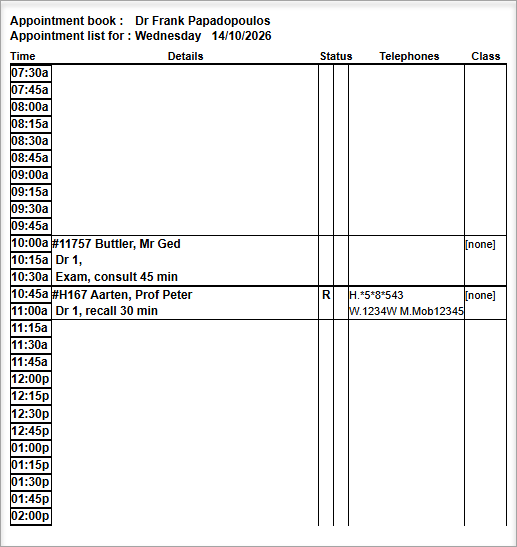
Print daysheet Compact
A printable compact daysheet for the selected date.
Work time Analysis
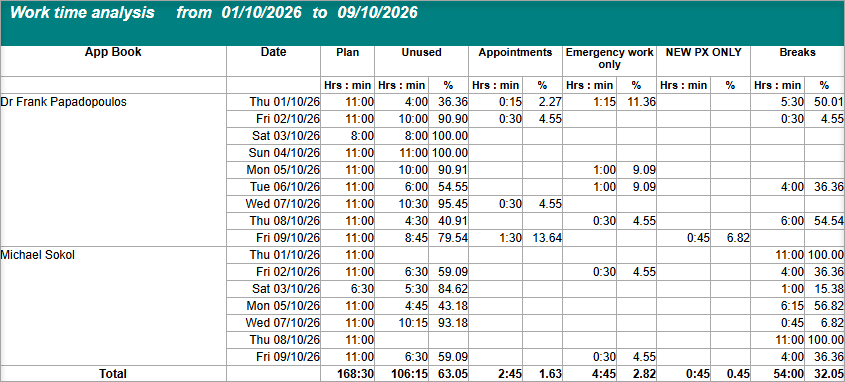
This report will provide a breakdown of your appointment book over a selected period. It is based on booked time, vacant appointment slots, pre-booked slots & work time settings in breaks.
Work time examples:
- White spaces in the appointment book are considered unused / vacant.
- If leaving early, add a break and select the Work Time: No.
- For staff meetings, add a break with Work Time: Yes
Run the Report
- Time range: Select the period or custom dates selection: From > To.
- Location: Select the location or <Any Location > from the drop list if applicable.
- Daily Breakdown: If date range includes multiple days, tick to show data per day.
- Show all slot types: Tick to include all types of Pre-Booked slots even if they have not been used.

Need help setting up your Pre-Booked Slots?
Report Details
- App Book: Each book you selected in the above parameters.
- Plan: Total hours included in the appointment book over the report period.
- Unused: Total time that is not designated, i.e. no appointments, Non-work time breaks.
- Appointments: Total time that has been filled with appointments.
- Daily breakdown: Day by day breakdown for each selected provider.
- Show All Slot Types: Pre-Booked Slots & Breaks will be shown based on the work time setting option when running the report.
Report example Daily Breakdown ticked.
Report example with Show All Slot Types ticked
Day Information (all books) Report
A report based on appointments for the selected date/s. It is generally used as a compact day sheet for all books instead of printing individually
- Time range: Select the period or custom dates selection: From > To. Forward dates are also possible for planning purposes.
- Appointment Book: Select the books to include
- Show Inactive Books: Place a tick in the box if you wish to include an inactive book
- Appt Book Page Break: If viewing more than one book at a time, you can separate the books onto separate pages
- Click OK
Report Details
- Time: Start- Finish time of the appointment
- Details: Patient name, Provider, Duration, Notes, $$ Due
- Telephones: Contact details
- Status: Any appointment Statuses for that patients appointment
- Class: Was Appointment class selected
Patient Bookings - Appointed By Report
This appointment book report generates a listing of all appointments made for a selected period for a provider/s, by each staff member.
Report Requirements
When scheduling/modifying an appointment, the Appointed By must be selected.
Run the Report
- Time range: Select the period or custom dates selection: From > To
- Appointment Books: Highlight the books to base this report on
- Providers/Staff: Tick individual or multiple rows by showing list:
- All Staff: This will show a list of all providers and staff members
- Providers: This will only show providers
- Other Staff: This will only show staff members
- Show Inactive Providers: This will show inactive providers
Click OK
Report Details
- Books & Provider/Staff listed
- Booking made date - Appointed By name - Number of appointments booked
- Patient names - Date of their appointment
Planned Production Report
This report calculates planned production according to treatment plans linked to upcoming patient appointments.
Report Requirements
This report requires any treatment plan items to be linked to the patients appointments. This allows the report to calculate the planned production.
Links:
Run the Report
- Time range: Select the period or custom dates selection: From > To
- Location: Select the location or <Any Location > from the drop list if applicable
- Divide by date: If multiple days are included in the report, tick this to divide each day
- Appointment Books: Highlight the book/s to base this report on.
- Show inactive Books: Tick box to include books previously made inactive
Report Details
The report will collect information for the selected reporting period on the date of appointment, and the total amount of fees planned for that visit.
- Patient: Name of patient in the appointment book
- Date: Date of appointment
- Plan fees: If patient has a treatment plan and the items/treatment to be completed at this appointment are linked.
If an appointment is not linked to a treatment plan or has no treatment plan, those patients will be included in the report with a plan fee of $0.00 - Total for book: The name of the book and The total amount planned for the time period selected
- Total: Overall total for all books selected
Appointment Time Report
The Appointment Time report generates information based on the Arrived, Checked In and Checked Out times of each appointment for a selected date range.The report is useful to practice managers, particularly as they can view the percentages of arrivals, overtime, providers running overtime and walk-ins.
Appointment Requirements
For the report to generate the information required, you must always have selected the Arrived, Checked In and Checked Out times for the appointment
Run the Report
- Time range: Select the period or custom dates selection: From > To
- Location: Select the location or <Any Location > from the drop list if applicable.
- Group by Date: If multiple days are included in the report, tick this to divide each day.
- Show summary only: When ticked, the report will show the overall data for the date range, not individual patient times.
- Appointment books: Select the appointment books you wish to base this report on
- Show inactive Books: Tick box to include books previously made inactive
- Click OK
Report Details
- % of late Arrivals: Percentage of all appts that have not been marked as Arrived within 5mins of the start time
- % not seen on time: Percentage of all appointments that Checked In after their appointment start time
- % where Prv was late: Percentage of all appointments that Checked Out after their appointment end time
- % overtime: Percentage of all appointments that have a total duration that exceeds the booked time
- Walk Ins (within 2 hrs): Count of all appointments attended that were booked within 2 hours of the appointment time
- Average Wait (min): Average time patients had to wait for their appointments
- Average Duration (min): Average time patient’s appointments went for
- Total Wait (min): Total time patients had to wait for their appointments
- Total Duration (min): Total time patient’s appointments went for
Status Report
The Status Report provides a count of appointments with a particular status in a period of time and the fees generated for items performed at this appointment.
For example, the number of Attended appointments last month.
Report Requirements
Use Status Types in the appointment window.
This is done during the creation of a new appointment or you can modify existing appointments.
Not all Status Types will be used at the initial creation of an appointment.
For example:
- The Status C: Confirmed will not be used until the appointment is confirmed.
- The status L: Lab work needed, may be used and report printed so all lab work due can be checked for arrival or completion in time for patient appointment.
- Time range: Select the period or custom dates selection From > To.
- Location: Select the location or <Any Location > from the drop list if applicable
- Status: Select the Status to base this report on
- Appointment Books: Select the appointment book/s to include in the report
- Show Inactive Books: Tick to include books previously made inactive
- Click OK
Report Details
- Patient: Name of the patient that matches the requested criteria of the report
- DOB: Date of birth
- Phone: Contact phone number
- Date: Date of appointment
- Time: Time of appointment
- Duration: Duration of appointment
- Fees: Fees generated for items performed at this appointment
Status Report (Non-Financial)
This report shows how many times Appointment Statuses have been used on appointments for over period of time.
It can be used to show multiple statuses added into the patient appointment, in one report.
For example, all appointments that Confirmed, and also have lab work but do NOT look at fees generated for items performed at this appointment.
Run the Report
- Time range: Select the period or custom dates selection From > To.
- Location: Select the location or <Any Location > from the drop list if applicable
- Status: Highlight multiple Statuses to base this report on
- Show patients with only one of the selected: Choose to only base the report on one of the selected statuses
- Appointment Books: Select the appointment book/s to include in the report
- Show Inactive Books: Tick to include books previously made inactive
- Click OK
Three ways of running the report
There are three ways the report can be run, dependent on the parameters selected.
- Report on patients with all selected statuses against their appointment
E.g. Patient has both Confirmed and Lab work needed statuses - Report on appointments with only one of the selected statuses
E.g. Confirmed and Lab wok needed are highlighted, but patients with either will show - Report on patients with no appointment status
Appointment Class Report
The Appointment Class Report provides a count of appointments with a particular class with fees in a period of time.
For example, the number of Crown and Bridge appointments last month.
Run the Report
- Click the navigation menu > Appointments
- Right click in any appointment slot > Print > Appointment Class Report
- Time range: Select the period or custom dates selection From > To.
- Location: Select the location or <Any Location > from the drop list if applicable
- Class: Select the Class to base this report on
- Appointment Books: Select the appointment book/s to include in the report
- Tick Box of heading row to select all books, untick to deselect all
or
Tick box of individual books - Show Inactive Books: Tick to include books previously made inactive
- Click OK
Report Details
- Patient: Name of the patient that matches the requested criteria of the report
- DOB: The Date of Birth of the Patient
- Phone: Patients Phone number
- Date: The Date of the Appointment
- Time: The Time of the Appointment
- Duration: The Duration of the Appointment
- Fees: The Fees generated for items performed on the date of the Appointment
Appointment Class Report (non- financial)
The Appointment Classes Report (non-financial) provides a count of appointments with a particular class in a period of time. For example, the number of Crown and Bridge appointments last month.
Run the Report
- Click the navigation menu > Appointments
- Right click in any appointment slot > Print > Appointment Class Report (non-financial)
- Time range: Select the period or custom dates selection From > To.
- Location: Select the location or <Any Location > from the drop list if applicable
- Class: Select the Class to base this report on
- Tick Box of heading row to select all classes, untick to deselect all
or
Tick box of individual classes - Appointment Books: Select the appointment book/s to include in the report
- Tick Box of heading row to select all books, untick to deselect all
or
Tick box of individual books - Show Inactive Books: Tick to include books previously made inactive
- Click OK
Report Details
- Patient: Name of the patient that matches the requested criteria of the report
- DOB: The Date of Birth of the Patient
- Date: The Date of the Appointment
- Time: The Time of the Appointment
- Duration: The Duration of the Appointment
Appointment Attended with No Treatment Recorded Report
This report checks the treatment records of all appointments marked as Arrived for the selected date range, it will then check for treatment recorded.
Only those patients who have been marked as Arrived but have no treatment recorded will be included in this report
Reporting Requirements
- Appointments must have a Provider selected
- Appointments must be marked as Arrived
Run the Report
- Click the navigation menu > Appointments
- Right click in any slot > Print > Appointments attended with no treatment recorded
- Time range: Select the period or custom dates selection From > To.
- Location: Select the location or <Any Location > from the drop list if applicable
- Appointment Books: Tick Box to select Appointment Book/s to include
- Providers: Tick box to select the providers to include
- Click OK
Report Details
- Appointment date - Book name - Provider - Patient & ID
Note: Patients will continue to appear on this report if attended, until treatment items are entered against their file for the same date as the appointment.
Patient Specific Reports
Appointment Card
Click here to learn how to setup & print patient’s next appointment(s) to a label, which can be attached to a business card.Appointment Series Style A & Appointment Series Style B
The Appointment Series reports are a printout of appointments scheduled for the selected patient.
Run the Report
- Click the navigation menu > Appointments
- Right click in any appointment slot > Print > Appointment Series Style A or Appointment Series Style B
Report Parameters
- Find the patient
- Search date range or enter from - to dates
- Select Books to search or leave it at <All books>
- Tick box if search should include inactive books
- Click Search
- Click Go to in the Appointments found section if you wish to go to the appointment slot
- Click Edit header/footer to edit the message shown in the printout
- Click Print to preview/ print the series
Style A
Style B
Medical History Form
The user can select the Medical History Form option from the appointment slot.
- Right click on Patients appointment
- Print > Medical History Form
- The template will come up
- Make changes / Add information to the Letter for the selected patient as needed
For instructions on how to create a Medical History Form, click here.