Appointments V4: Additional Navigation & Features in Dental4Web

ATTENTION: Appointment Book V4 is in PILOT MODE.
- Available only to a selected few while we complete the pilot phase.
- General release is coming soon.
- During the Pilot phase, we are creating Knowledge Base articles and will continue to add and update them.

Navigate the Appointment Book
The Appointment Book has plenty of shortcuts to help you find what you need in fewer clicks. Hover over an appointment for a quick view of its details, search for a patient to jump straight to their booking, and head to their charting, treatment plan or invoices directly from the appointment slot.
This guide also covers how to adjust time slot durations, insert non-standard slots, find the next vacant slot, and use the colour palette to organise breaks and pre-booked slots
Book Scroll Bars
Use the scroll bar on the right of each column to scroll it individually, or use the main scroll bar to scroll all columns at once.
Quick View Appointment Details
To have a quick overview of a patients appointment:
- Hover over appointment, to see details such as contact info, appt time, provider, class, statuses.
- Move mouse away from appointment to remove quick view
OR - Hover and click on appointment to see details and keep the quick view window open.
1. This window will only close when the appointment is clicked again or when you move to another screen/page.
2. This option allows multiple appointments to have quick view window open at the same time
Feature Flash Video: Appointment Quick View
Patient Searches in Appointments
From the Appointment page user can Search for Patient to retrieve appointments, run a consolidated report, edit Patient file or delete patient or Find Patient to take you to the Patient Details page.
Search For Patient
- Click the navigation menu > Appointments
- Expand the Options sidebar > Patients tab:
- Search for Patient
- With the patients name highlighted
- Search beginning from: Select date range from the drop list or a specific date
- Click Search
- In the Appointment found list
- To go to the selected appointment slot, Click Go to
Edit Patient Details
- With the patients name highlighted
- Click Edit
- This will take you to the Patient Details page where you may edit details
Run consolidated Report
- With the patients name highlighted
- Click Consolidated Reports
 Want to know more about Consolidated Reports? Click here
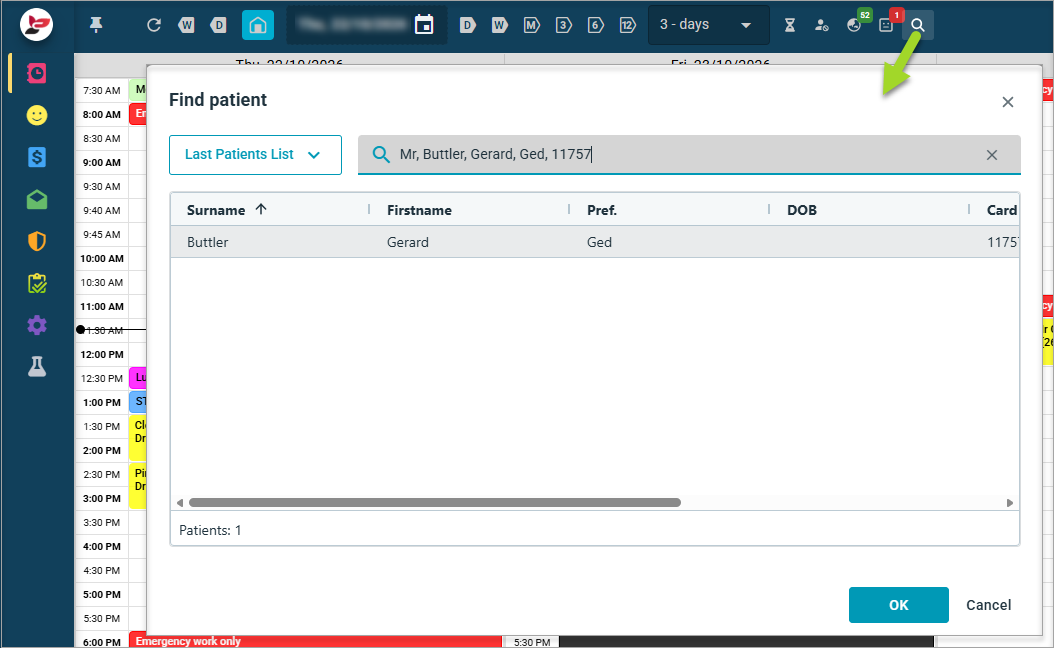
Find Patient
Use the find icon in the Appointment toolbar to find a patient and go to their Patient Details
Go To > Various Patient Pages
Go to patient files from the Appointment Slot. Options available are found in 2 lists.
The most commonly used pages from an appointment are listed directly under and less often used are found in a secondary click option.
- Right click on appointment
- Go to (The Quick List) Patient details | Charting | 3D Charting | Treatment plan | Treatment details
Or - Click on Go to > For invoices | Receipts | Letters | Document Manager
Open further links
(Release build 26.1023)
Open patient page in new browser tabs or windows.
- Right click on patient appointment > Go to
- Highlight/ hover any of the Patient pages ( Patient details, Charting etc)
- Right click again to open in a new Browser Tab or Browser Window
- Left click to select the option required:
- Open link in new tab - opens the Patient page in another D4Web tab
- Open link in a new window - opens D4Web window in another browser
- Open link in InPrivate window - opens a D4Web window in a private browser
- Open link in split screen window - opens the Patient page in another D4Web tab side by side
Time Slots
Appointment Time Slots / Intervals defaults for each appointment book and/or day (15mins, 30mins etc.) are setup according to your preferences at time of the Appointment book initial setup
Change Slot Durations for a Full Day
The following instructions apply to only the day(s)/date(s) selected
- Click the navigation menu > Appointments
- Right click on the appointment book day > Select Change day/book setup
- Enter the new Slot Duration
- Click OK
Insert a Non Standard Slot Within a Day
A Non-standard slot is used to enter anything less than the standard slot duration, e.g. 4mins.
- Click the navigation menu > Appointments
- Right click in the slot where the interval will be placed (e.g. 9:00am) Insert new > Non-standard slot
- Add the minutes required (e.g. 5mins) in the Inserted interval field
- Click OK
- A 5min interval now exists, where an appointment may be scheduled
Find a Time Slot
Use the Time Slot search function when looking for the next vacant appointment slot or a pre-booked slot or even a break type or eAppointment slot.
- Click the navigation menu > Appointments
- Expand the Options sidebar > Time Slots tab:
- Search from date: The default date will be the date you are in and then select the search period
- Time range: Select range from the drop list
or
Days ahead: Select the number of days to search ahead - Duration (min): The duration of the slot
Start at / End at: Enter a start time and end time of search parameters (or leave default if anytime suits) - Including days: Tick box for days you want included in the search (days that are not open can be ignored)
- Slot type: Select breaks, pre-booked, class types, vacant appointment slot from the drop list
- Appointment Books: Tick box to include the appointment book in the search
- Click Find
- Found Slots: A List of all the available slots
- Go to: Click to go directly to that slot
- Appointment book: The appointment book name
- Day: The day of the week
- Date: The date of the slot
- Start: The start time of the available slot
- Dur.: The duration of the slot (is equal or less than the Duration selected above)
To reset the default slot duration for the overall book, see Appointment Book TemplatesDental4Web Colour Palette
Multiple colours are available in Dental4Web, with 50 colours available to choose from
Use them for:
Appointment Book Status: When creating an Appointment Book Status
Appointment Book Class: When creating an Appointment Book Class
Appointment Book Breaks: When creating individual Breaks or breaks in the template
Pre Booked (Pre-Set) Slots: When setting up your pre booked slots
-----------------------------------------------------
Other topics of interest may include: