General Information in Dental4Web

General information & descriptions about Dental4Web, including customer reference number, agent download, Landing page & Appointment Book navigation and toolbar descriptions.
Overview of the Main Areas & Modules
Dental4Web has seven (7) main areas: Patients, Management, Debtors & Marketing, Insurance, Setup, Laboratories. Within each system area there are numerous modules.
- Everything related to the Appointment Book is in the Appointments page.
- You can access Patient‑file modules from the Patients area.
- Modules related to the Management of the systems features and business.
- Debtors & Marketing is the modules used to setup and send marketing queries, recalls, and debtor reminders.
- Use the modules in Insurance to set up and manage insurance companies and more
- Configure Business and Clinical settings in Location Setup.
- Setup and manage Laboratories
Common Features
Take a look around and get a feel for the common features found in Dental4Web.
- Navigation Bar: The Navigation Bar sits on the left side of every page. Here is a list of all the Main areas & modules within Dental4Web.
- Pin: Click the pin icon to lock the navigation bar open. Click it again to switch back to showing the menu only when you hover.
- Refresh: The Refresh icon is also found in every page, use to refresh the Dental4Web page in view. (Not to be mistaken for Windows refresh.)
- Find: Use the find icon the search for a patient.
- Hamburger Menu: The Hamburger menu found on the right of every page. Once you click it, the panel stays open until you click it again to close. The hamburger menu includes multiple features usable in ONLY the current page and/or many options available regardless of what page you are viewing.
Navigation Bar
To pin or unpin, view modules listed from the Navigation Bar:
- Use your mouse to hover over the bar, the navigation bar will open.
- Click the Pin icon to keep the Navigation Bar open.
Hamburger Menu
To view / use / link to common features found in the Hamburger Menu:
- Click on the Hamburger Menu icon
- Scroll through to find User Account information, Miscellaneous features such as Clock On & Clock Off, terminal pairing, download options, links to eSupport & Learning Centre, System information and more.
Feature Flash Video: Common Features
Find your Customer Reference Number in Dental4Web
The customer reference number (CRN) is a number Centaur uses to identify each practice.
The CRN is used to check current support contract, contact details, what modules and features are installed and previous contact between Centaur and the Practice.
When contacting Centaur, provide this number to streamline the process.
- Within the About Dental4Web window:
- Click the hamburger menu > System Information > About
- See the Customer Reference
- In General Settings
 Click here for General Setting Groups & Descriptions in Dental4Web
Landing Page
When open Dental4Web the last organisation used is memorised at the login.
Wrong Username &/or Password
Wrong usernames &/or passwords at Landing/Login page?
See alert icon and message
  when incorrect username and/or password is entered.
Navigating the Appointment Book
The Appointment Book Toolbar
Toolbar icons descriptions from left to right
Go Backward by Week or Day
Today
Date in view. Click
icon to drop Calendar
Go forward by Day, Week, Month, 3Months, 6Months, 12Months
Standby List
Cancellation List
Patient bookings via eAppointments
eServices Patient Conflicts (icon is white when the list is empty)
Location name
Icons ONLY visible when to Single Book View
Show 1 to 9 days
Single Book View
Book name
Icons ONLY visible when to Multi Book View.
Show/ View 1 to 9 books on screen
Move forward or backward when the number of books in group is larger than books in view
Multi Book View
Appointment Group name when in Multi book view
Change Appointment Book View
Single Book View
Used to view one Book / Provider at a time for up to 9 days at a time.
- Click the navigation menu > Appointments
- Click Single Book View icon
- Select number of days to view
Multiple Book View
Used to view up to 9 Books / Providers at a time with the ability to scroll to more books.
- Click the navigation menu > Appointments
- Click Multiple Book View icon
- Select number of books to view or the group to view
Multiple Location Book View
Only when a database is set up to view more than one location at a time is this feature available.
- Click the navigation menu > Appointments
- Select Location from drop list
- Select the location to view
![]() Grouped Book View
Grouped Book View
This feature is used to group selected appointment books into one view, rather than viewing all books simultaneously
Dental4Web Colour Palette
Multiple colours are available in Dental4Web, with 50 colours available to choose from.
Use them for:
Appointment Book Status: When creating an Appointment Book Status
Appointment Book Class: When creating an Appointment Book Class
Appointment Book Breaks: When creating individual Breaks or breaks in the template
Pre Booked (Pre-Set) Slots: When setting up your pre booked slots
Dental4Web AGENT Download
Agent Setup
Browsers have an inherent security design feature, not allowing an application (apps) in a browser to access local PC devices or other components (other than Printers) that protects against rogue / malicious behaviour.
"The Dental4Web AGENT purpose is to allow secure communication to devices via the browser apps."
eg. HICAPS/Tyro, Desktop Scanners, 3rd party Imaging links etc.
Windows protected your PC
Some PCs may encounter this warning:
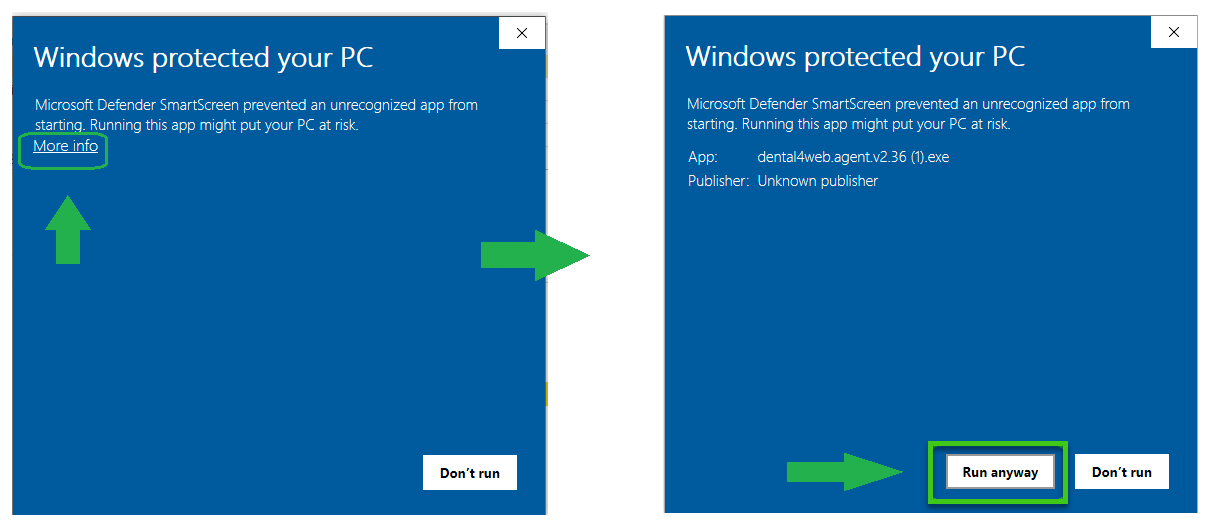
If this is the case, please do the following:
- Click on More Info
- In the 2nd window, click Run Anyway
Important Information:
If Agent is not installed in Dental4Web on a computer
- Click the hamburger menu > Dental4Web AGENT download
- Select Show in folder when download is completed
- Double click the file to start installation
- Once installation has finished, you should be able to find it in the Notification area (lower right corner)
- If not, you can find the dental4web.agent from Start menu
- Double click or Click Open to launch D4web.agent
When Agent is not running or an update is needed
A popup message will appear when Dental4Web is started
- Click the Download latest AGENT link within the message
- Follow steps in Agent Setup above
To turn off current version of D4Web.Agent
- Go to Notification area
- Right click on the D4Web.Agent icon > Exit
- Follow steps in Agent Setup above to reinstall/update
Related Articles
Setup New Provider & Manage their Records in Dental4Web
This article covers Setup & Management of any type of Provider. Providers also includes: Dentists and any Dental Practitioner with a provider number, Locums, Cert IV Radiography Elective Assistants, Dental Hygienists, Therapists & Oral Health ...Understanding the Dental4Web General Settings page
There are hundreds of General Settings within D4Web. Some are preset to ensure accurate use of a module or feature and some are customisable and can be set to meet your practice preferences. Where to find General Settings Click the navigation menu > ...General Information in Dental4Windows
Below is information on How to find the Practice's Customer Reference Number, Windows 11 Information and how to validate the Dental4Windows database. How to find the Practice's Customer Reference Number The customer reference number is a number ...Patient Reports in Dental4Web
There are a number reports found directly in the various Patients pages Communication Log Report View communication <sent to> and <received from> the patient Click the navigation menu > Patients > any Patients page View toolbar > Communication Log In ...Setup New Provider & Manage their Records in Dental4Windows
Listed below are instructions handing provider numbers for hygienists, Therapists and Oral Health Therapists for CDBS claims, add a new provider, add a new hygienist, add a new locum, Add a New Dental Assistant (Cert IV Radiography Elective), set ...