Understanding (2D & 3D) Charting in Dental4Web

Understanding tooth surfaces, as well as controls and navigation within D4Web before setup and using the charting features will ensure a smoother experience for the user. These tools can also be used for clinical staff training.
Where to find the Charting pages in D4Web
Click the navigation menu > Patients > Charting

Click the navigation menu > Patients > 3D Charting
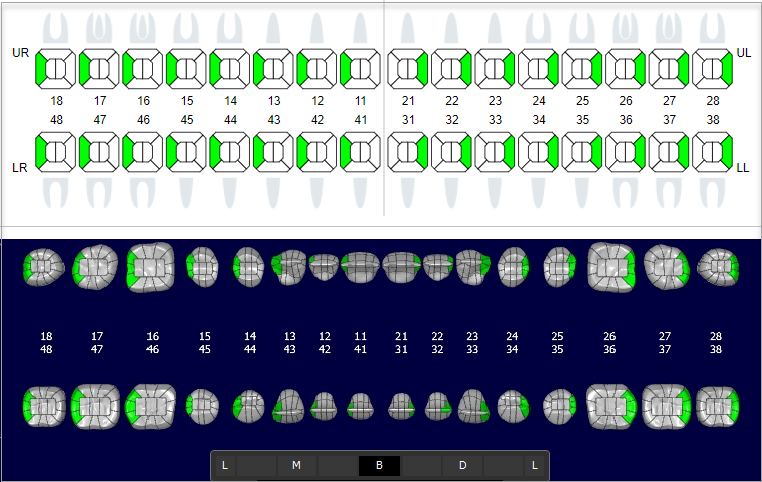
2D & 3D Tooth Surface Explanation
Listed below are images of charting surfaces for both 2D Charting & 3D Charting.
Distal
The letter [D] is used to describe surface in Treatment Plan and Treatment.
The Distal is situated on the farthest surface from the centre of the mouth.
![]()
The letter [M] is used to describe surface in Treatment Plan and Treatment.
The Mesial is situated towards the centre/middle surface of the mouth
Labial
The letter [L] is used to describe surface in Treatment Plan and Treatment.
The Labial is situated on the surface near the lips.
Buccal
The letter [B] is used to describe surface in Treatment Plan and Treatment.
The Buccal is situated towards the surface facing cheeks for premolar and molar teeth only
Palatal
The letter [P] is used to describe surface in Treatment Plan and Treatment.
The Palatal is situated towards the surface facing the palate. Upper teeth only.
Lingual
The letter [L] is used to describe surface in Treatment Plan and Treatment.
The Lingual is situated towards the surface facing the tongue. Lower teeth only
Incisal
The letter [I] is used to describe surface in Treatment Plan and Treatment.
The Incisal is situated on the cutting edge surface.
The letter [O] is used to describe surface in Treatment Plan and Treatment.
The Occlusal is situated on the chewing surface, for premolar and molar teeth only.
Clinical Cheat sheets
To help staff with quick reference of D4Web keyboard shortcuts, icons and images, we have created Cheat Sheets.
Print directly or download as PDF and print / laminate and then cut out, to secure at the reception desk or surgery computer for regular reference.

3D Charting Controls and Options
3D Charting Examples
Large MO
Small MO
Large MOBL
Small BOP
Large B
B Root
Control Panel
The control panel is located to the left or right (depending on general settings) of the screen and is used to change the rotation and/or position of all teeth.
Rotation - All teeth
- The rotation control is located on the left or right (depending on setting) of the Current Condition and Treatment Required screen and is used to rotate all teeth either by surface (B, O, and L) or the Rotation Wheel. If you have selected to ‘Synchronise View’; the Current Condition and Treatment Required will move together
Position - All teeth
- The position of all teeth can be moved by holding down ‘Ctrl’ on the keyboard while moving the mouse in the direction you wish to position the teeth.
- The rotation of all teeth can be changed by holding down ‘Shift’ on the keyboard while moving the mouse in the direction you wish to rotate the teeth. You can also zoom in/out by using the mouse scroll wheel
Right Click Options
Select Tooth
- Right click on tooth > Select tooth
- Choose Selected tooth rotation or Selected tooth displacement to be altered from the controls
Select Bridge
- This option is only available when a bridge is highlighted
- Right click on tooth > Select bridge
- The selected bridges position can be changed by using this option
![]() Undo Selection
Undo Selection
- To exit out of the above modes, right click on the tooth/ bridge and select undo selection or simply press the ‘x’ on the control panel
Show Connector
- Right click on tooth > Select Show connector
- With this turned on, you can see the connector between teeth
One Tooth Mode
- Right click on tooth > Select One tooth mode
- The selected tooth will be the only tooth in view.
- To exit One Tooth mode > Right click on tooth > Select Exit one tooth
Layers
- Right click on tooth > New layer
- Repeat to add Multiple layers
- Right click on tooth > Delete Layer
- Repeat to delete multiple layers
- Right click on tooth > Lower / Upper Layer
- Repeat to move between the layers.
Toggle Adult/Deciduous
- This is only available when on a Mixed Chart
- Charting toolbar > Show Mixed Chart > Click Yes button or No button on message depending on which view you would like (deciduous or adult).
- Right click on tooth > Select Toggle adult/deciduous
Properties/Delete Items
- Right click on tooth > Properties/Delete Items
- A list of all procedures, conditions and/or notes will be displayed.
- Highlight row/s in the list and click DELETE
Bridge Properties/Delete Items
- Right click on each tooth of the bridge > Properties/Delete Items
- It will display all procedures, conditions and/or notes for all teeth involved.
- Highlight row/s in the list and click DELETE
3D Charting View Preferences
A default view can be set per computer for the 3D Charting page.
Position the screen using the following options
- Tooth/ View Rotation Set
- Position of all teeth
- Zoom size of teeth
- Tooth surface view
Setup & Manage Charting Features
Related Articles
New Zealand Dental Benefits Scheme in Dental4Web
The New Zealand Dental Benefits Scheme - Preset features, Adding & Editing, Generating Approvals & Claims Preset & Setup Features OHSA & SDSA Items OHSA & SDSA items are preset in D4Web Items page, there is nothing to do here. Click the navigation ...NZ Dental Benefits in Dental4Windows
Charting patients under the NZ dental benefits scheme. Charting Patients under New Zealand (NZ) Dental Benefits Scheme To ensure the correct items are used, when charting for a patient under either the Oral Health Service for Adolescents (OHSA) or ...Setup & Manage 2D & 3D Charting in Dental4Windows
Understand 3D charting controls and options, tooth surface explanation, 3D charting view preferences and set 3D charting display options. Understanding 3D Charting Controls and Options Control Panel The control panel is located to the left or right ...Using Charting features in Dental4Web
Some of the features found in Charting: View Mixed, Deciduous or Adult charts, layering, View & link to Documents / Imaging & Treatment Plans Where to find the Charting pages Click the navigation menu > Patients > Charting or 3DCharting page Note: ...General Settings Group for "Charting" in Dental4Web
Custom Settings for 2D, 3D & Perio Charting features. Note that the settings are listed here alphabetically for easier search/reading, however may not be in the same order in Dental4Web Where to find the General Setting Click the navigation menu > ...