Working in the Invoices page in Dental4Windows

Listed below are instructions on Individual or family view in invoices, claims and receipts, preview/print an invoice from the invoices tab, add a custom message to invoice or receipt, manually split accounts per provider, mark an outstanding balance as bad debt and delete (reverse) an invoice.
Individual and/or Family View in Invoices, Claims and Receipts
When patients are grouped into a family, the view in Treatment, Invoices, Claims and Receipts tabs can be changed between Individual and Family view.
Family View to Individual View
- Go to Patient Records > Invoices/Claims/Receipts tab
- Click Family View icon to change to Individual
- Patient: Select the relevant patient to view
Individual View to Family View
- Go to Patient Records > Invoices/Claims/Receipts tab
- Click Individual View to change to Family
Preview/Print an Invoice from the Invoice tab
Once an invoice has been created, it can be previewed onscreen or printed.
- Go to Patient Records > Invoices tab
- Highlight the invoice to be previewed/printed
- Invoices menu > Select Preview Selected or
icon
- Click Print to print the invoice
Add Custom Message to Invoice or Receipt
Custom messages can be added to individual invoices and receipts when previewing them.
 Commonly used messages can be added to the Fast Notes group Invoices (Accounts).
The following instructions are how to use preset notes (above) or add more when in the patient file. Previewing and Invoice/Receipt can be done from many areas, but more commonly this is done at the time of invoice (F2) or receipt (F3).

- Preview the Invoice/Receipt
- Click Message
- Show Messages for
- Provider: preset messages will appear for the selected Provider(s)
- Patient: previously used messages will appear for the patient
- Provider: Only available if Provider is selected above, choose to view preset notes either for all providers or an individual
- Select the message to include, or click Add to create a new one
- Click Select to add the selected message to the invoice
- Selected message will now appear on invoice or receipt
Manually Split Accounts per Provider
To manually only include select one Provider at a time when processing an invoice, deselect the provider at during the invoice creation. Alternatively, this can be set to automatically split whenever there are two Providers. - Go to Patient Records > Treatment tab
- Itemised Invoices menu > New Invoice Only / Press F2 key / Click Invoice Only icon
- In the background, deselect the second Provider
Mark an Outstanding Balance as a Bad Debt
To help categorise debtors, any balance considered a Bad Debt should be marked as such.
Marking a Bad Debt can be completed for the patients' file, or the Debtors tab.
Mark within Patient File
- Go to Patient Records > Invoices tab
- Select the invoice
- Invoice menu > Mark/Clear Bad Debt / Click Bad Debt icon
Mark from Debtors tab
- Go to Debtors & Marketing > Debtors tab
- Select the invoice
- Click Bad Debt icon
Discount Outstanding Balance
A discount can be applied to an outstanding invoice after it has been created.
- Go to Patient Records > Invoices tab
- Double click in the $ Discount / % Discount field of the outstanding line
- Click Add
- Enter correct Instalments No to be discounted> OK
- Select the Category
- Enter the Discount by $ or % value
- Double click N to add a Note if applicable
- Click OK
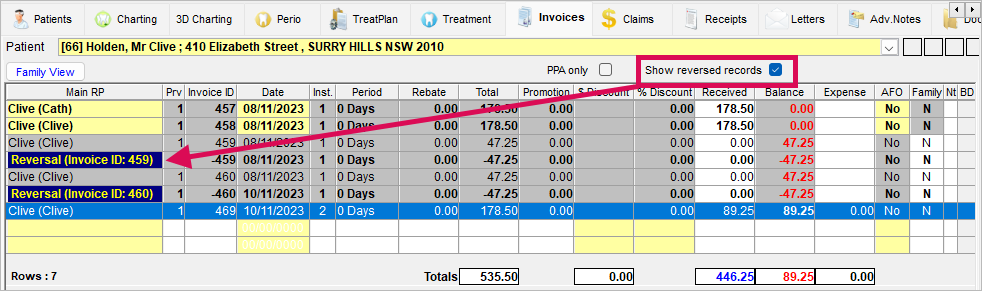
Delete (reverse) an Invoice
An invoice can only be reversed once the associated receipt and Claim is removed. Reverse them, then follow these steps. - Go to Patient Records > Invoices tab
- Highlight the Invoice to reverse
- Press the Reverse Invoice icon
- If security is setup, enter Username, Password and Reason
To see reversed details from the patients file, place a tick in Show Reversed Records.
Invoice date is too far from previous invoice date
Error
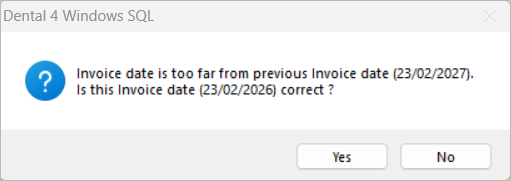
Cause
This message often appears when trying to create an invoice because a previous invoice has been created with a date in the future. This can also happen if there is treatment dated is in the future as well.
Fix
- Take note of the previous Invoice date
- Go to Location Management > Reports > Run Accounting: Invoices and Receipts over a period
- In Report Parameters enter previous invoice date and tick Show inactive providers as well
- The report will list the name of the patient with the invoice in the future
- Go to this Patients Treatment and check if there is treatment dated in the future. Change to correct date. Go to Invoices tab and change the Date of the invoice to the correct date.
- The message will pop up one last time so click Yes.
- Message will no longer appear when you create invoices.
Related Articles
Working in the Treatment Page (Clinical features) in Dental4Web
The Treatment page is used for both clinical & admin purposes. The purpose of this article is for the clinical side of treatment and includes instructions on Treatment plan transfer, Treatment completed, clinical notes (incl fast notes). Links to the ...New Zealand Dental Benefits Scheme in Dental4Web
The New Zealand Dental Benefits Scheme - Preset features, Adding & Editing, Generating Approvals & Claims Preset & Setup Features OHSA & SDSA Items OHSA & SDSA items are preset in D4Web Items page, there is nothing to do here. Click the navigation ...Working in the Invoices page in D4Web
The Invoices page holds all invoice information created for the family. Here the user can add custom invoice messages, reverse invoices, mark invoices as bad debts, check HICAPS transactions, give discounts, reprint invoices Where to find the ...Working in the Treatment Page (Admin features) in Dental4Web
The Treatment page is used for both clinical & admin purposes. The purpose of this article is for the administrative side of treatment and includes instructions for invoicing, payments & reprinting. Links to the various other related features ...Working directly via the Receipts page in Dental4Web
The Receipts page caters to payments made, deposits & deposit refunds, discounts after invoice is created & processing Bounced Cheques. Payer, method of payment and date changes can be made here too. These instructions focus only on payments made & ...