Manage features found in Items page in Dental4Web

The Items page has many add on functions to enhance the Item setup, including:
- Financial details items, Inventory items, GST tariff items.
- Reporting and non reporting items
- And many other item related actions
Where to find the Items page
Click the navigation menu > Location Setup > Items page
Search for an Item Code
Search for an Item by entering either the Code or Description.
- Record toolbar > Find an item
- Enter the details in the Item Code or Item Description field to find the item
- Click FIND
- Highlight the row
- Click GO TO
- The item code will be highlighted in the background
- Click CANCEL to close the above window
Mark an Item as Obsolete
When an item number is no longer relevant, it can be marked as obsolete to remove it from item lists. Obsolete items can still be reported on if required.
- Select / find the item to make obsolete
- Tick Obsolete box
Enter the date that the item becomes obsolete
- Click OK
Repeat for all other obsolete items
Print List of Item Numbers
A list of all items codes and their details can be printed. Each category of items is separated on the report so you can easily view each item code you have entered.
- Record toolbar > Items List
- Select options from the toolbar in the preview:
- Print All or Print Current page
- Select page to view
- Export & Save
- Select Format
Setup GST Tariffs on Items Codes
- Record toolbar > GST Tariffs
- Click New Start Date icon
- Enter the date the GST rate comes into effect
- Click OK
- Enter the amount in the GST % column for applicable items
- Or if the amount applies to all items, click SELECT ALL > SET GST TO SELECTED ROWS
- New Tariff: Select this option if there is no existing GST percentage against the highlighted item/s
- Increase: Select this option if there is an existing GST rate entered against the highlighted item/s and you want to increase it to a new rate i.e. Original GST rate = 10% and increase by 5%. New GST rate is 15%
- Decrease: Select this option if there is an existing GST rate against the highlighted item/s and you want to decrease to a new rate i.e. Original GST rate = 10% and decrease by 5%. New GST rate = 5%
- Click OK
- Click OK
Assign Item to a Location
For Multi-location environments, some locations have their own specific item numbers.
E.g. Marketing promotion package, items for specific centres or regions.
Users can setup new items or assign existing items to a specific location, to reduce input errors at locations that don’t use the items, and have the ability to limit the locations at which an item can be entered.

By default, all existing and new items entered in the system are assigned to all locations. The practice will manually select which items are specific to a certain location/s
This feature will only cover entry of item number/s via Charting 2D/3D, Treatment Plan and Treatment pages.
The item is no longer visible when trying to use an item not specific to the location
- Add a new item or select an existing item
- Click ASSIGN ITEM TO LOCATION
- In the 'Select Locations' Window:
- Mark Show at selected Locations radio button
- Tick box of locations from ‘Not Available’ list
- Click ADD SELECTED to add the location/s to ‘Available’ list
- Click OK
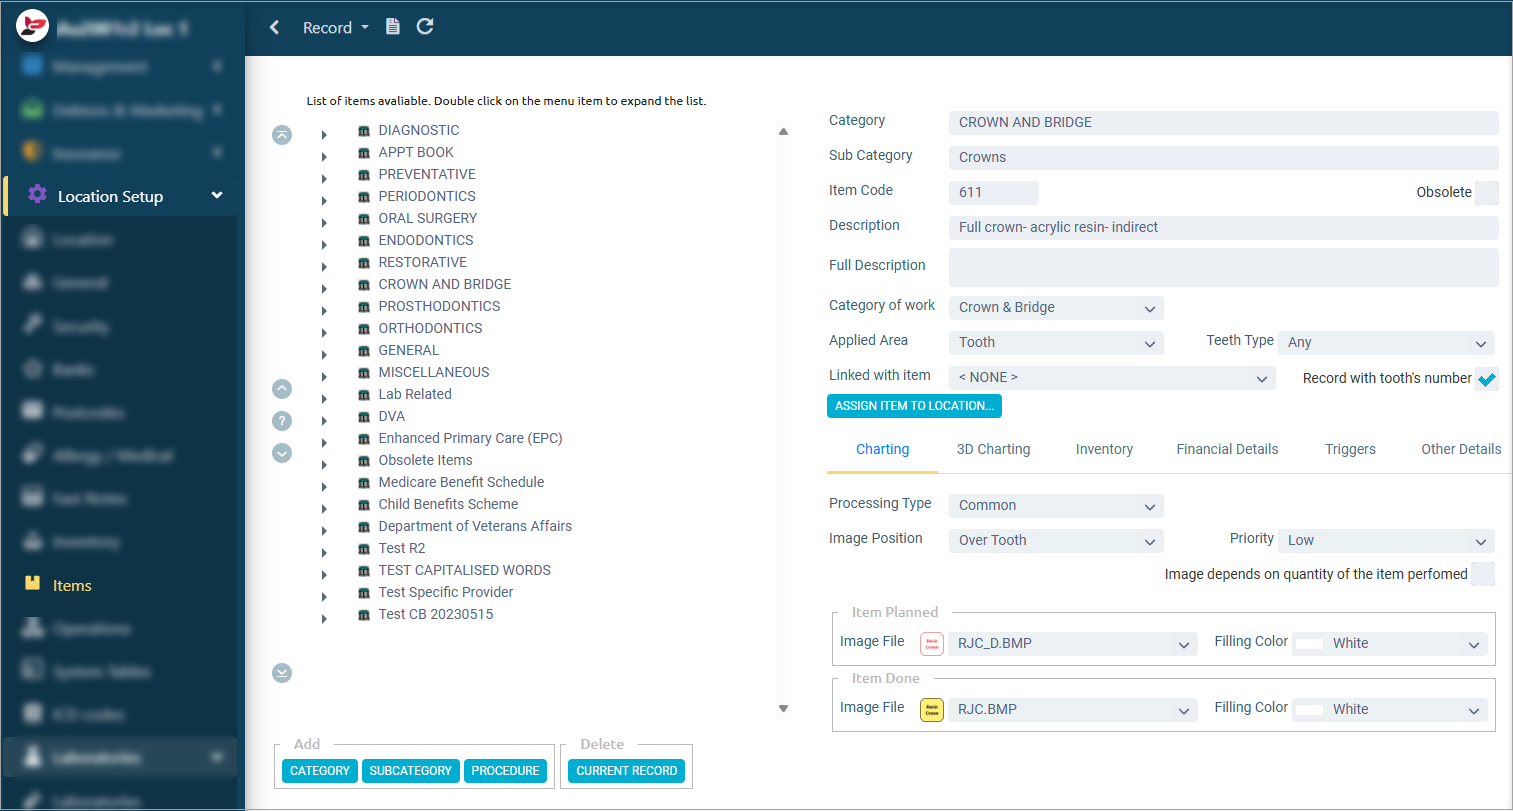
Charting Tab
Setup Item to be Charted in 2D Charting
When an item number should be charted, but is not setup in D4Web to do so, complete the following actions.
The example used in this instruction is a Temporary Filling, item 572.
- Select the relevant item to be setup for charting, or add a new item
- Applied Area: Select the most appropriate
- Surface: The image/colour will cover the selected surface(s), e.g. Fillings
- Tooth: The image/colour will cover the entire tooth, e.g. Crowns
- Upper Jaw: The image/colour will apply to only the upper jaw, e.g. Full Dentures
- Lower Jaw: The image/colour will apply to only the lower jaw, e.g. Full Dentures
- All Teeth: The image/colour will apply to all teeth
- Upper Teeth: The image/colour will apply to only the upper teeth, e.g. Partial Dentures
- Upper Jaw: The image/colour will apply to only the lower teeth, e.g. Partial Dentures
- Teeth Type: Select the most appropriate
- Any: The image/colour can be applied to either deciduous or adult teeth
- Primary: The image/colour is only chartable on deciduous teeth
- Permanent: The image/colour is only chartable on permanent teeth
- Record with Tooth's Number: Tick to automatically record the tooth ID in Treatment Plan
- Charting tab
- Processing Type: Common (other options are for preset items only)
- Image Position: Select where the image should be placed, the options differ depending on the Applied Area selected above
- Priority: Low
- Item Planned: Either an image or a colour can be selected to represent the item
- Image File: Click to find an appropriate image (optional)
- Filling Colour: Select a colour for the surface, also seen as a background when an image is present
- Item Done: Either an image or a colour can be selected to represent the item
- Image File: Click to find an appropriate image (optional)
- Filling Colour: Select a colour instead of an image, also seen as a background when an image is present
3D Charting Tab
Setup Item to be Charted in 3D Charting
When an item number should be charted, but is not setup in D4Web to do so, complete the following actions. The example used in this article is a Temporary Filling, item 572.
- Select the relevant item to be setup for charting, or add a new item
- Applied Area: Select the most appropriate
- Surface: The image/colour will cover the selected surface(s), e.g. Fillings
- Tooth: The image/colour will cover the entire tooth, e.g. Crowns
- Upper Jaw: The image/colour will apply to only the upper jaw, e.g. Full Dentures
- Lower Jaw: The image/colour will apply to only the lower jaw, e.g. Full Dentures
- All Teeth: The image/colour will apply to all teeth
- Upper Teeth: The image/colour will apply to only the upper teeth, e.g. Partial Dentures
- Upper Jaw: The image/colour will apply to only the lower teeth, e.g. Partial Dentures
- Teeth Type: Select the most appropriate
- Any: The image/colour can be applied to either deciduous or adult teeth
- Primary: The image/colour is only chartable on deciduous teeth
- Permanent: The image/colour is only chartable on permanent teeth
- Record with Tooth's Number: Tick to automatically record the tooth ID in Treatment Plan
- 3D Charting tab
- Processing Type: Common (other options are for preset items only)
- 3D Image Position: Select where the image should be placed, the options differ depending on the Applied Area selected above
- Priority: Low
- Planned
- Cell Colour: Select a colour to apply to the selected surface cells
- Content: Select the most appropriate for this item
- Symbol: Select and enter a character in the Symbol field below
- Symbol on Background: Select and enter the Symbol and Background below
- Picture: Select and choose the picture from Picture Filename below
- Text Colour: Select from the options available
- Done
- Cell Colour: Select a colour
- Content: Select the most appropriate for this item
- Symbol: Select and enter a character in the Symbol field below
- Text Colour: Select from the options available
- Hint: Enter a hint to display when the tooth is rotated and image/colour is no longer in view
- Always Show Hint: Tick to show the hint, even when the image/colour is visible
Financial Tab
Add Estimated Time to Complete an Item
Individual item numbers can have an estimate duration to complete the procedure. This is to calculated estimated time on some reports and the Treatment Plan. Groups of items cannot have an estimated time.
 Turn on the General Setting - In treatment Plan set estimated time to complete automatically according to items settings. (Link coming soon)
To setup each item that requires a est time to complete
- Select the relevant item
- Financial Details tab
- Enter the minutes in Est. Time to Complete, min
- When the item is added to the Treatment Plan, the estimated time will be automatically inserted into the "Min" column
- When items are selected for an appointment, D4Web will calculate the total time and the duration will be auto filled

Estimated time can be edited within the Treatment Plan and/or the time of Appointment scheduling
Associate Non-ADA Item with an ADA Item for Claiming
Special code for HCONNECT is used when you have setup an item code that still needs to be processed through the HICAPS terminal.
For example, you may have a 521 and a 521. to for Composite or GIC in the system. The 521. is not recognised as an ADA item therefore against the 521. , enter the correct item code of 521 in the Special Code for HCONNECT.
- Select the item in question
- Financial Details tab
- Special code for HCONNECT = type ADA item code (e.g. 521)
Show Items in Invoices or Not
By default, all item codes are shown in invoices. However, you have the option to remove item codes from patient invoices. This will mainly be for item codes that are not accountable and/or treatment i.e. NOTES
- Select the item
- Financial Details tab
- Remove tick from Show in Invoices to exclude the item from invoices
When you remove the tick from this box, the item code will not show in the Fees tab eitherLink Item to a Specific Provider
If an item code is to only be used by one provider, you can select the provider from the drop list.
This means when you enter the item code to Treatment, it will automatically change the provider to that of the one selected in the items setup.
- Select Item
- Financial Details tab
- Select provider name from the Specific Provider drop list
Other Details Tab
Mark Items as Non-Reporting
Any item which should not be included in reports should be marked as a Non-Reporting item.
- Highlight the Item > Other Details tab
- Tick Non-Reporting box
Mark Items as Non-Treatment
Any item which is not considered treatment must be setup as such to ensure reports and recalls run correctly.
- Highlight the Item > Other Details tab
- Tick Non-Treatment
Tooth ID is Required
By selecting Tooth id is required, the user will be forced to enter the Tooth number while in Treatment.
You should only set this up for items that actually relate to a specific tooth.
When entering these items into Treatment Plan/Treatment pages, a message will pop to remind you to enter tooth number.
- Select the item > Other Details tab
- Tick Tooth id is required
Tooth Surface is Required
By selecting Tooth Surface is required, the user will be forced to enter the Tooth surface while in Treatment.
You should only set this up for items that actually relate to a specific tooth.
- Select the item > Other Details tab
- Tick Tooth Surface is required
Set Related Actions to Items - Convert Deciduous to Adult
- This is to be applied to all chartable item codes that will only ever be applied against an adult tooth
- For example, Dentures, they will only ever be charted for a patient against adult teeth but not deciduous.
- This will only work when using 3D Charting and there are some perquisites.
- Charting must be completed from the 3D Charting page and the patient must be set to a ‘Mixed’ chart in order for the automatic process to work.
- Possible from the Treatment Plan/Treatment tab but in order for this to work correctly:
- The patient must have their date of birth entered
- Their age must fit between the ages of a mixed dentition
- The item must also have ‘Tooth ID is required’ checked on the individual item setup
- Select the item e.g. 711
- Open Other Details tab
- Select Convert Deciduous tooth to Adult tooth from the Related Action drop list
Set Related Actions to Items - Missing Tooth
This is to be applied to all item codes that involve the removal of a tooth. It forces the tooth to be removed from Charting.
For example, the item code 311 Removal of tooth or part thereof, has a related action of set missing tooth.
- Select the item e.g. 311
- Open Other Details sub-tab
- Select Set Missing Tooth from the Related Action drop list
Links to instructions for setup & management of specific items:
Related Articles
Items Category - Sub Category - Item Codes in D4Web
Item codes/ procedures are organised and sit within a Category > Sub Category. For instance: Items 511-515 sit under the Amalgam Sub Category which sits under the Restorative Category. Where to find the Items page Click the navigation menu > Location ...Item Triggers in D4Web
There are 2 types of Trigger items in D4Web: An item to item trigger that allows you to always have an item code automatically enter into treatment when another is entered. For example, each time you enter the item code 114 you want 121 to be entered ...New Zealand Dental Benefits Scheme in Dental4Web
The New Zealand Dental Benefits Scheme - Preset features, Adding & Editing, Generating Approvals & Claims Preset & Setup Features OHSA & SDSA Items OHSA & SDSA items are preset in D4Web Items page, there is nothing to do here. Click the navigation ...Manage Item Features in Dental4Windows
Listed below are instructions on the ADA 13th item schedule, set missing tooth, eClaims attachment is required, mark an item as obsolete, search for an item, items list, ignore missing tooth, tooth ID or surface required, convert deciduous tooth to ...Working in the Treatment Page (Clinical features) in Dental4Web
The Treatment page is used for both clinical & admin purposes. The purpose of this article is for the clinical side of treatment and includes instructions on Treatment plan transfer, Treatment completed, clinical notes (incl fast notes). Links to the ...